Help Me! (FAQ)
This page contains a list of tips and tricks that will help you watch the videos in stereo3D if something goes wrong.
I. About
This website is targeted at people who have nVidia 3D Vision or nVidia 3D Vision Surround gear. The videos will also play in 2D if the system is not stereo3D ready.
The videos were created focusing on the best possible detail both in-game and during the encoding process. While the quality might be lower than the actual "captured" footage it strives to provide good High Definition (HD) quality.
Supported view modes:
- Single Monitor 2D: Fit whole image to screen or display only the center screen (which is what you would normally see when playing on a single monitor)
- Single Monitor Stereo3D using 3D Vision: Fit whole image to screen or display only the center screen (which is what you would normally see when playing on a single monitor)
- Multi-monitor 2D: By pressing F11 and setting the browser fullscreen
- Multi-monitor Stereo3D - nVidia 3D Vision Surrond: By pressing F11 and setting the browser fullscreen.
II. System Requirements
A broadband connection is mostly required. Also a LAN cable might provide better results than WiFi.
nVidia 3D Vision:
All the videos use HTML5 video playback. It does not use Adobe Flash Player.
The website uses the official nVidia API to query if your system is capable of playing the videos in stereoscopic 3D directly from your browser.
If your system can not play the videos in 3D it will provide feedback on how to do this.
For multi-monitor 3D Vision users the videos can be viewed in full Surround stereoscopic 3D by pressing F11 key making your browser to go Fullscreen.
Currently only Mozilla Firefox supports stereo 3D playback in HTML5 directly from the browser.
Anaglyph (using a nVidia Geforce video card):
Even if you don't have a 3D Vision kit, you can still see the videos in stereoscopic 3D in anaglyph mode provided your computer has a nVidia Geforce graphics card.
In order to do this you need to:
- Make sure you also install the "3D Vision driver component" when you install the nVidia Geforce driver;
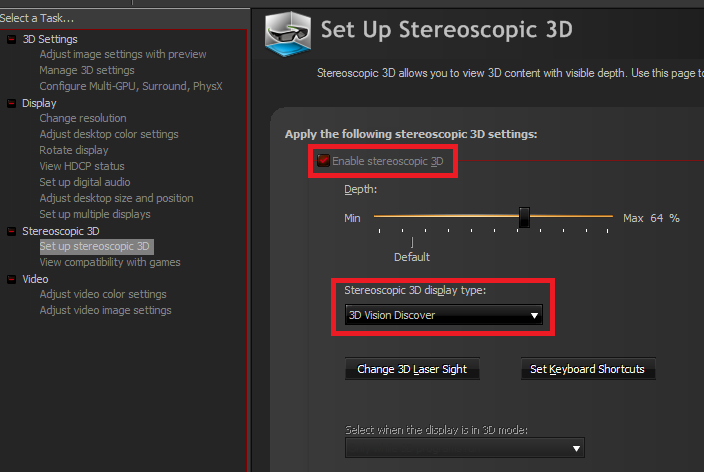
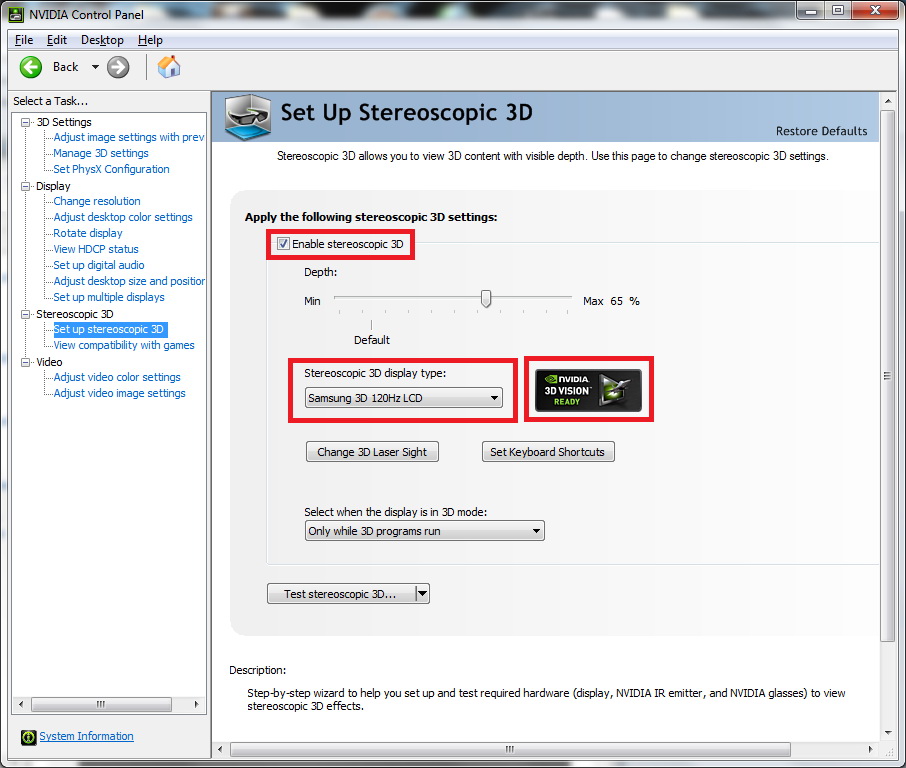
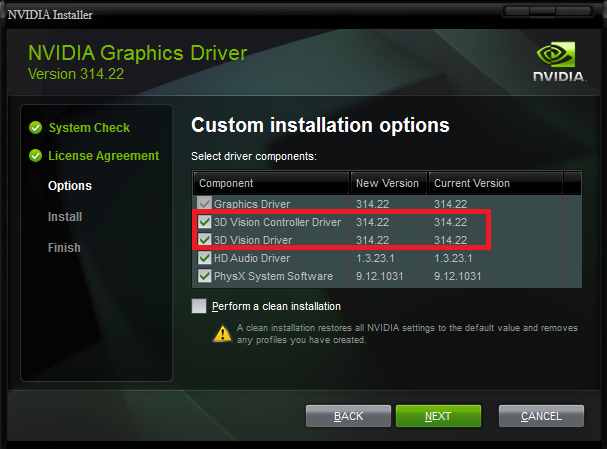 - In nVidia Control Panel, under "Stereoscopic 3D" menu, "Set up stereoscopic 3D" tab you "Enable stereoscopic 3D" and set the type to "3D Vision Discover";
III. Laptops Only
If you are using a laptop, the browser must use the discreet chip (the nVidia GPU) and not the Intel Chipset one.
If your laptop doesn't have a GPU from either nVidia or AMD you will not be able to see any videos.
This is because the Intel Chipsets do not support resolutions higher than 4096.
V. [Tutorial] - How to use an external 3D Vision Monitor with your laptop
The following is a tutorial for those who want to do 3D Vision Surround or even just 2D Surround OR simply want to hook their laptop with a 3D monitor !
=======================================================================================================
PART I - Identify what type of MONITOR you have (Some of this information you will not find in the official specs !!!!!)
=======================================================================================================
- On your PC, connect the Monitor to a DL-DVI port and ensure 3D Vision is working.
- GO to nVidia Panel select "Change Resolution" and click CUSTOMIZE
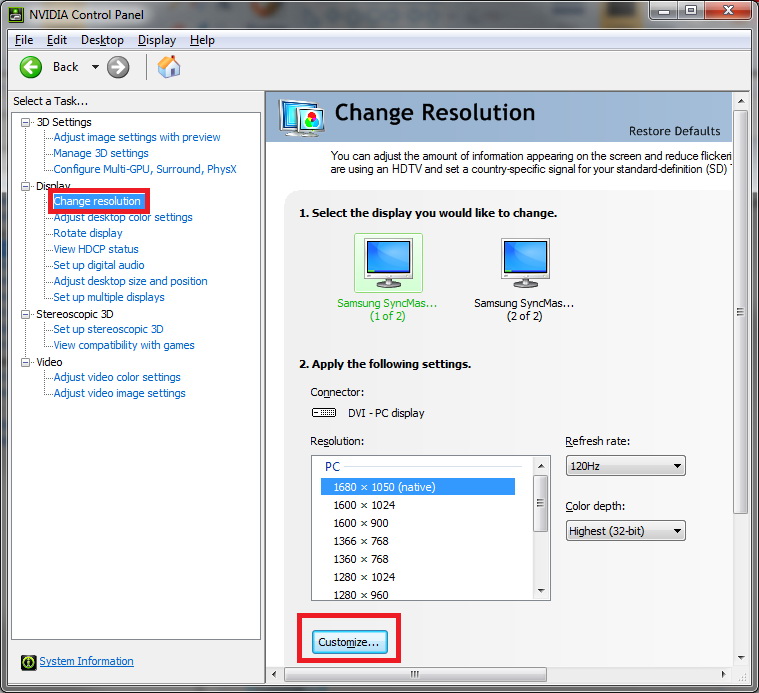 - Don't select anything here and press CREATE CUSTOM RESOLUTION...
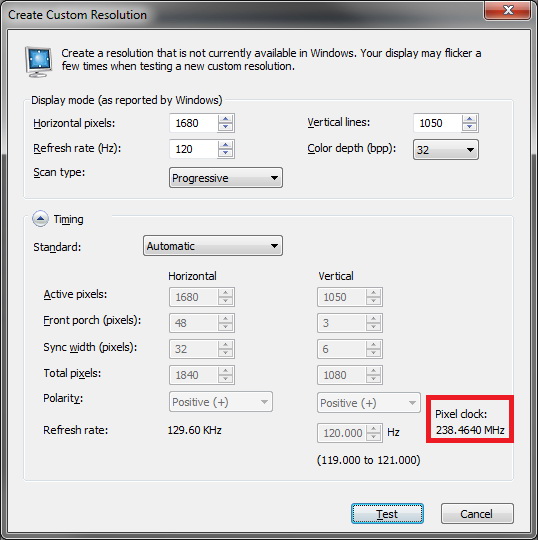
 - In this new dialog you can see what is the PIXEL CLOCK frequency your monitor is using!!! REMEMBER THIS VALUE!!!
 =======================================================================================================
PART I.1 - LAPTOPS ONLY!!!
=======================================================================================================
- If you plan to hook a 3D monitor to your laptop first of all we need to be sure that you have a (mini) Display Port that is actually HOOKED with your nVidia GPU and not the Intel one.
- In order to do this, on your laptop, go to nVidia Panel -> "Set PhysX Configuration"
=======================================================================================================
PART I.1 - LAPTOPS ONLY!!!
=======================================================================================================
- If you plan to hook a 3D monitor to your laptop first of all we need to be sure that you have a (mini) Display Port that is actually HOOKED with your nVidia GPU and not the Intel one.
- In order to do this, on your laptop, go to nVidia Panel -> "Set PhysX Configuration"
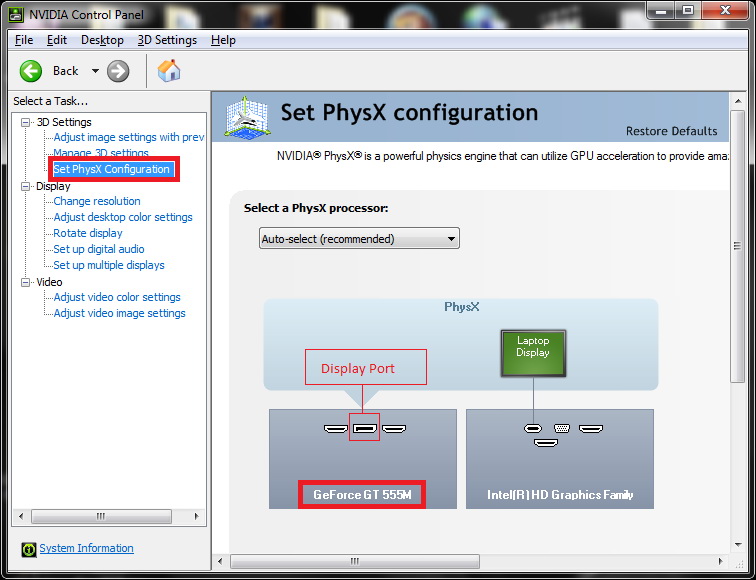 - Here look under your nVidia GPU and Identity IF THE DISPLAY PORT IS DIRECTLY hooked to it or not.
In the above picture you can clearly see that the DP port is linked directly to the nVidia GPU and is not routed through the Intel Chipset (unlike the HDMI or the VGA that is linking directly to it)
=======================================================================================================
PART II - Looking for a (mini) Display Port to DL-DVI(D/I) ACTIVE adapter
=======================================================================================================
- For 3D Vision you will need an ACTIVE adapter /converter.
- First note the type of cable your monitor is using:
- Here look under your nVidia GPU and Identity IF THE DISPLAY PORT IS DIRECTLY hooked to it or not.
In the above picture you can clearly see that the DP port is linked directly to the nVidia GPU and is not routed through the Intel Chipset (unlike the HDMI or the VGA that is linking directly to it)
=======================================================================================================
PART II - Looking for a (mini) Display Port to DL-DVI(D/I) ACTIVE adapter
=======================================================================================================
- For 3D Vision you will need an ACTIVE adapter /converter.
- First note the type of cable your monitor is using:
 - Second, after you found a converter that has both your connections (Display Port(mini) to DL-DVI-(D/I) TRY TO FIND OUT WHAT BANDWIDTH IT SUPPORTS !!! (This is where the PIXEL CLOCK from image 2 comes into place). You will want a converter with a bandwidth that is a bit higher than your monitor's pixel clock frequency or otherwise IT WILL NOT WORK!!!
This is the tricky part since most adapters/converters don't specify this (in the internet specs), but if you ask directly the company that produces them you will be able to obtain this information!
=======================================================================================================
PART III - Hooking your Monitor + Converter + PC/Laptop
=======================================================================================================
- After you have the converter in hand I found out that is best to connect the cables in the following order:
a) PC/Laptop is OFF
b) DVI connector in the monitor
c) DVI connector in the adapter
d) (mini) Display port connector (From adapter) in the PC/Laptop
e) Not ENTIRELY Recommended But now you can start the PC and HOOK the USB connector from the Adapter to an USB port
f) SAFE AND RECOMMENDED WAY Skip step e). Hook the USB connector to your PC/Laptop and power up the PC/Laptop.
[IMPORTANT]
It will be MOST likely that your USB will not have ENOUGH Power to properly power the converter. Either try to hook it up to an USB port that is part of an USB HUB that has no other connections
OR
Recommended Buy an external ACTIVE USB HUB (that goes into the wall socket) and hook the USB power connector from the converter to this USB HUB.
For more info see [TROUBLESHOOTING] section at the bottom.
After you followed the above steps you should get something like this:
- Second, after you found a converter that has both your connections (Display Port(mini) to DL-DVI-(D/I) TRY TO FIND OUT WHAT BANDWIDTH IT SUPPORTS !!! (This is where the PIXEL CLOCK from image 2 comes into place). You will want a converter with a bandwidth that is a bit higher than your monitor's pixel clock frequency or otherwise IT WILL NOT WORK!!!
This is the tricky part since most adapters/converters don't specify this (in the internet specs), but if you ask directly the company that produces them you will be able to obtain this information!
=======================================================================================================
PART III - Hooking your Monitor + Converter + PC/Laptop
=======================================================================================================
- After you have the converter in hand I found out that is best to connect the cables in the following order:
a) PC/Laptop is OFF
b) DVI connector in the monitor
c) DVI connector in the adapter
d) (mini) Display port connector (From adapter) in the PC/Laptop
e) Not ENTIRELY Recommended But now you can start the PC and HOOK the USB connector from the Adapter to an USB port
f) SAFE AND RECOMMENDED WAY Skip step e). Hook the USB connector to your PC/Laptop and power up the PC/Laptop.
[IMPORTANT]
It will be MOST likely that your USB will not have ENOUGH Power to properly power the converter. Either try to hook it up to an USB port that is part of an USB HUB that has no other connections
OR
Recommended Buy an external ACTIVE USB HUB (that goes into the wall socket) and hook the USB power connector from the converter to this USB HUB.
For more info see [TROUBLESHOOTING] section at the bottom.
After you followed the above steps you should get something like this:
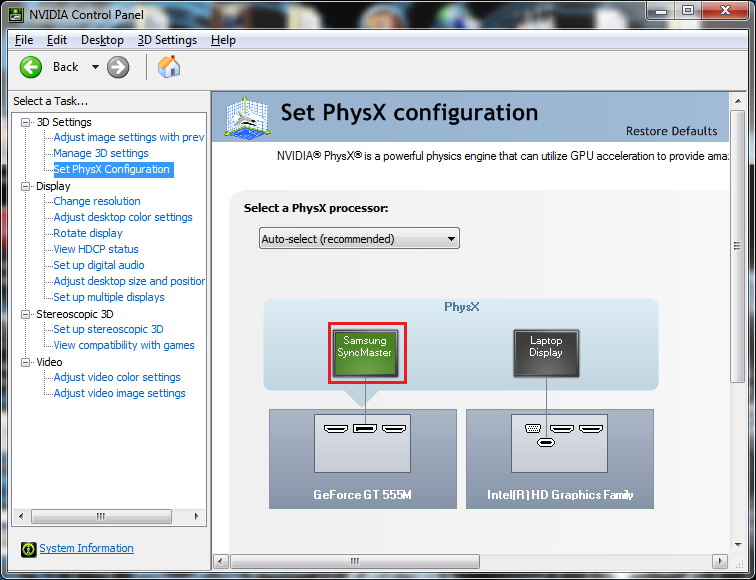 =======================================================================================================
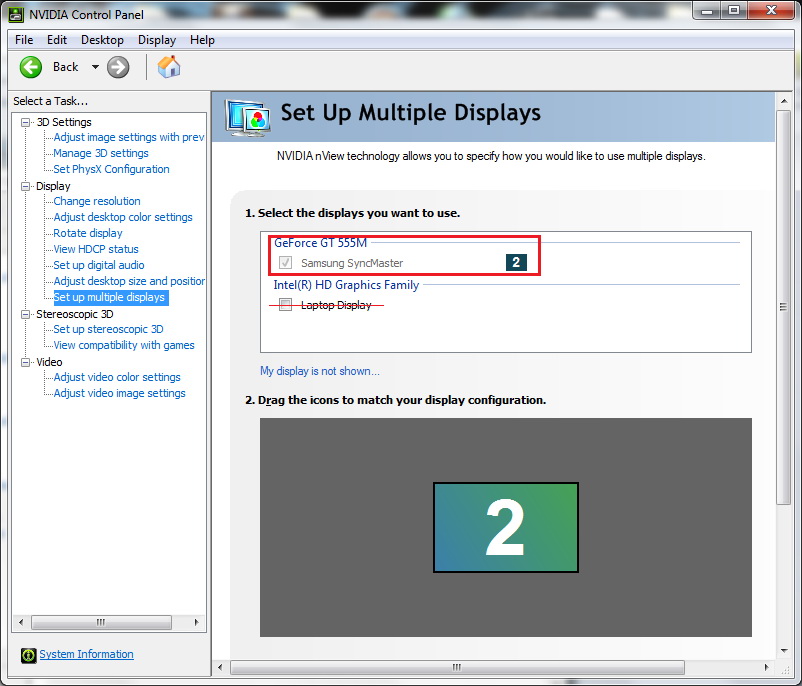
REVIEW aspect This is probably happening only on Laptops. I had some problems with my nvidia drivers (due to Optimus no doubt) when I was trying to keep both monitors active. (the laptop display + the 3D Monitor as primary). The problem appeared mainly when the monitor entered "3D mode". (like going dark and into stand-by mode etc)
I noticed this problem goes away if I enable ONLY the 3D monitor and disable the build-in laptop display as seen below:
=======================================================================================================
REVIEW aspect This is probably happening only on Laptops. I had some problems with my nvidia drivers (due to Optimus no doubt) when I was trying to keep both monitors active. (the laptop display + the 3D Monitor as primary). The problem appeared mainly when the monitor entered "3D mode". (like going dark and into stand-by mode etc)
I noticed this problem goes away if I enable ONLY the 3D monitor and disable the build-in laptop display as seen below:
 =======================================================================================================
PART IV - Setting up - 3D Vision - YEY!
=======================================================================================================
- Go to nVidia Panel -> "Change resolution" and select your refresh rate for the monitor. It should be able to do 2D 100Hz - 120Hz.
- Go to nVidia Panel -> "Setup stereoscopic 3D" tab and run the wizard.
- You will be able to finish the wizard normaly (for 3D Surround keep in mind that the wizard will appear only on the center monitor and NOT on all 3 screens, but all your monitors should be ON (not in stand-by). For Laptops is the same as regular PCs)
- After the wizard you will be able to see the following Picture:
=======================================================================================================
PART IV - Setting up - 3D Vision - YEY!
=======================================================================================================
- Go to nVidia Panel -> "Change resolution" and select your refresh rate for the monitor. It should be able to do 2D 100Hz - 120Hz.
- Go to nVidia Panel -> "Setup stereoscopic 3D" tab and run the wizard.
- You will be able to finish the wizard normaly (for 3D Surround keep in mind that the wizard will appear only on the center monitor and NOT on all 3 screens, but all your monitors should be ON (not in stand-by). For Laptops is the same as regular PCs)
- After the wizard you will be able to see the following Picture:
 =======================================================================================================
PART V - APP/GAME TESTING - YEY!
=======================================================================================================
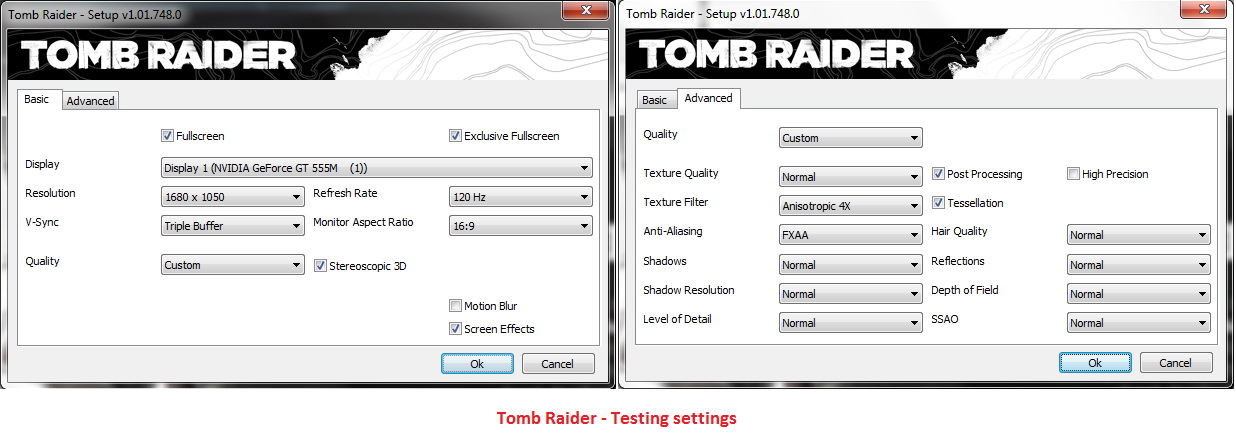
Advice !!! While playing a game in 3D Vision, your FPS will be HALVED from what you normally get in 2D. If you have 60fps in 2D, in 3D Vision you will get 30fps.
- On my laptop I had Tomb Raider (2013) installed so I used this one as one of the tests.
- As you can see the stereoscopic option was enabled and was usable.
=======================================================================================================
PART V - APP/GAME TESTING - YEY!
=======================================================================================================
Advice !!! While playing a game in 3D Vision, your FPS will be HALVED from what you normally get in 2D. If you have 60fps in 2D, in 3D Vision you will get 30fps.
- On my laptop I had Tomb Raider (2013) installed so I used this one as one of the tests.
- As you can see the stereoscopic option was enabled and was usable.
 =======================================================================================================
OPTIMIZATIONS
=======================================================================================================
DO NOT FOLLOW THESE STEPS IF YOU DON'T KNOW WHAT YOU ARE DOING!!!!
=======================================================================================================
=======================================================================================================
- My Laptop came with a Gt555M GPU (not the most powerful one as we all know). However, this GPU has alot of potential (and I mean Overclocking potential).
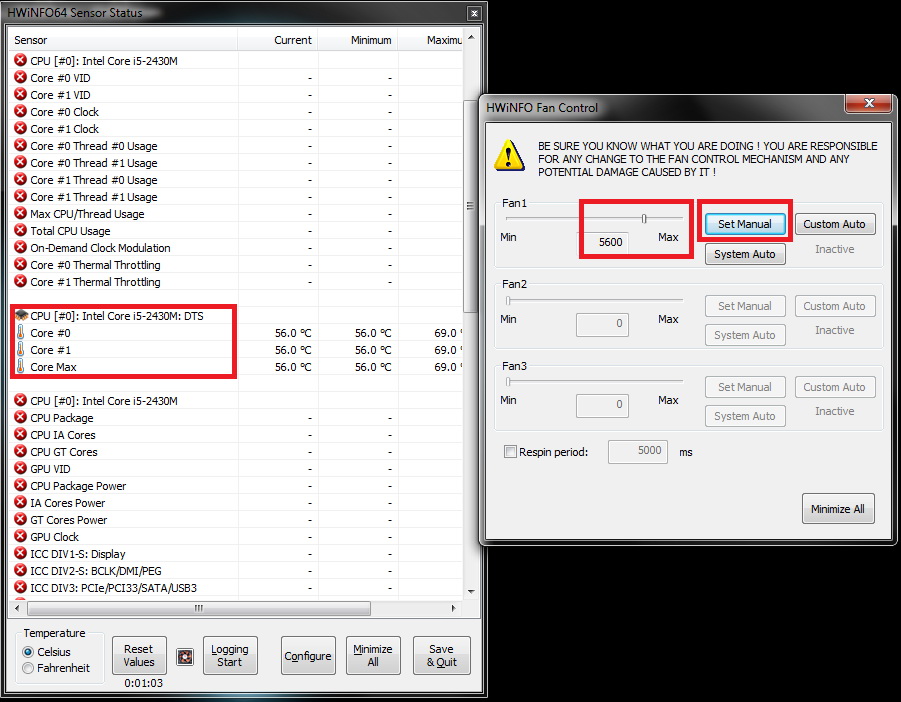
- Since 3D Vision will HUMP you Lapy's GPU like ...big time:)) (The GPU will be 99% used) you will need all the extra performance you can squeeze! But ofc your temperatures will go UUUUUP!.
a) Download and use a good Fan controller program like [url=http://www.hwinfo.com/download.php]HWInfo[/url].
b) On my Alienware laptop I had to disable all the sensors except the CPU-DS one or else the app will freeze after some time.
c) Set a GOOD MAXIMUM SPEED for your FAN.
d) ENSURE your laptop has a good airflow for cooling (a cooling pad might be handy)
=======================================================================================================
=======================================================================================================
OPTIMIZATIONS
=======================================================================================================
DO NOT FOLLOW THESE STEPS IF YOU DON'T KNOW WHAT YOU ARE DOING!!!!
=======================================================================================================
=======================================================================================================
- My Laptop came with a Gt555M GPU (not the most powerful one as we all know). However, this GPU has alot of potential (and I mean Overclocking potential).
- Since 3D Vision will HUMP you Lapy's GPU like ...big time:)) (The GPU will be 99% used) you will need all the extra performance you can squeeze! But ofc your temperatures will go UUUUUP!.
a) Download and use a good Fan controller program like [url=http://www.hwinfo.com/download.php]HWInfo[/url].
b) On my Alienware laptop I had to disable all the sensors except the CPU-DS one or else the app will freeze after some time.
c) Set a GOOD MAXIMUM SPEED for your FAN.
d) ENSURE your laptop has a good airflow for cooling (a cooling pad might be handy)
 a) Using MSI Afterburner or EVGA Precision Overclock your GPU.
THIS IS RELATED ONLY TO MY GPU - YOURS MIGHT BE TOTALLY DIFFERENT! You have been warned!!!
I manged to get this overclock on my GT555M. The temperatures were in a good 75-81 degrees Celsius (from a max of 95 degrees supported by my GPU)
a) Using MSI Afterburner or EVGA Precision Overclock your GPU.
THIS IS RELATED ONLY TO MY GPU - YOURS MIGHT BE TOTALLY DIFFERENT! You have been warned!!!
I manged to get this overclock on my GT555M. The temperatures were in a good 75-81 degrees Celsius (from a max of 95 degrees supported by my GPU)
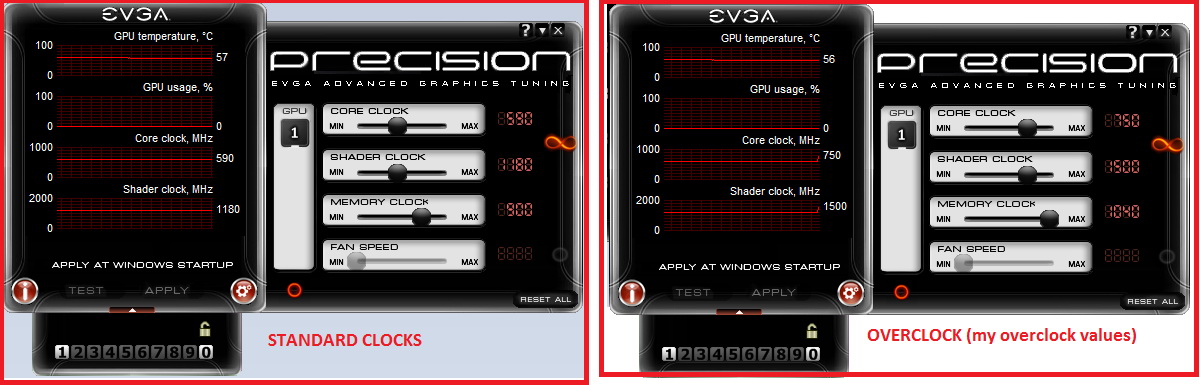 With the above overclock I manged to get 10 EXTRA FPS IN 3D MODE (which means around 20 fps in regular 2D)!!!
=======================================================================================================
Conclusions
=======================================================================================================
With the above overclock I manged to get 10 EXTRA FPS IN 3D MODE (which means around 20 fps in regular 2D)!!!
=======================================================================================================
Conclusions
=======================================================================================================
 Apparently my Laptop cannot provide the necessary power for the converter to RUN ALL THE TIME in 3D. More exactly:
- 2D @ 120Hz runs fine.
- First time after I power up the system and I enter in 3D mode, the image is crisp and clear and correct and 3D Mode ON.
- Afterwards if I exit 3D Mode and start a new App or the same app, 3D Mode kick in but the image is corrupt!!!
- I managed to fix this by removing the USB converter cable and reinserting it in the Laptop's USB port (after waiting like 20-30 seconds) and afterwards start a 3D app.
- The more permanent solution that I would recommend would be to plug the adapter in an active USB Hub.
=======================================================================================================
TROUBLESHOOTING
=======================================================================================================
1. If you followed all the above steps you should get the following image:
Apparently my Laptop cannot provide the necessary power for the converter to RUN ALL THE TIME in 3D. More exactly:
- 2D @ 120Hz runs fine.
- First time after I power up the system and I enter in 3D mode, the image is crisp and clear and correct and 3D Mode ON.
- Afterwards if I exit 3D Mode and start a new App or the same app, 3D Mode kick in but the image is corrupt!!!
- I managed to fix this by removing the USB converter cable and reinserting it in the Laptop's USB port (after waiting like 20-30 seconds) and afterwards start a 3D app.
- The more permanent solution that I would recommend would be to plug the adapter in an active USB Hub.
=======================================================================================================
TROUBLESHOOTING
=======================================================================================================
1. If you followed all the above steps you should get the following image:
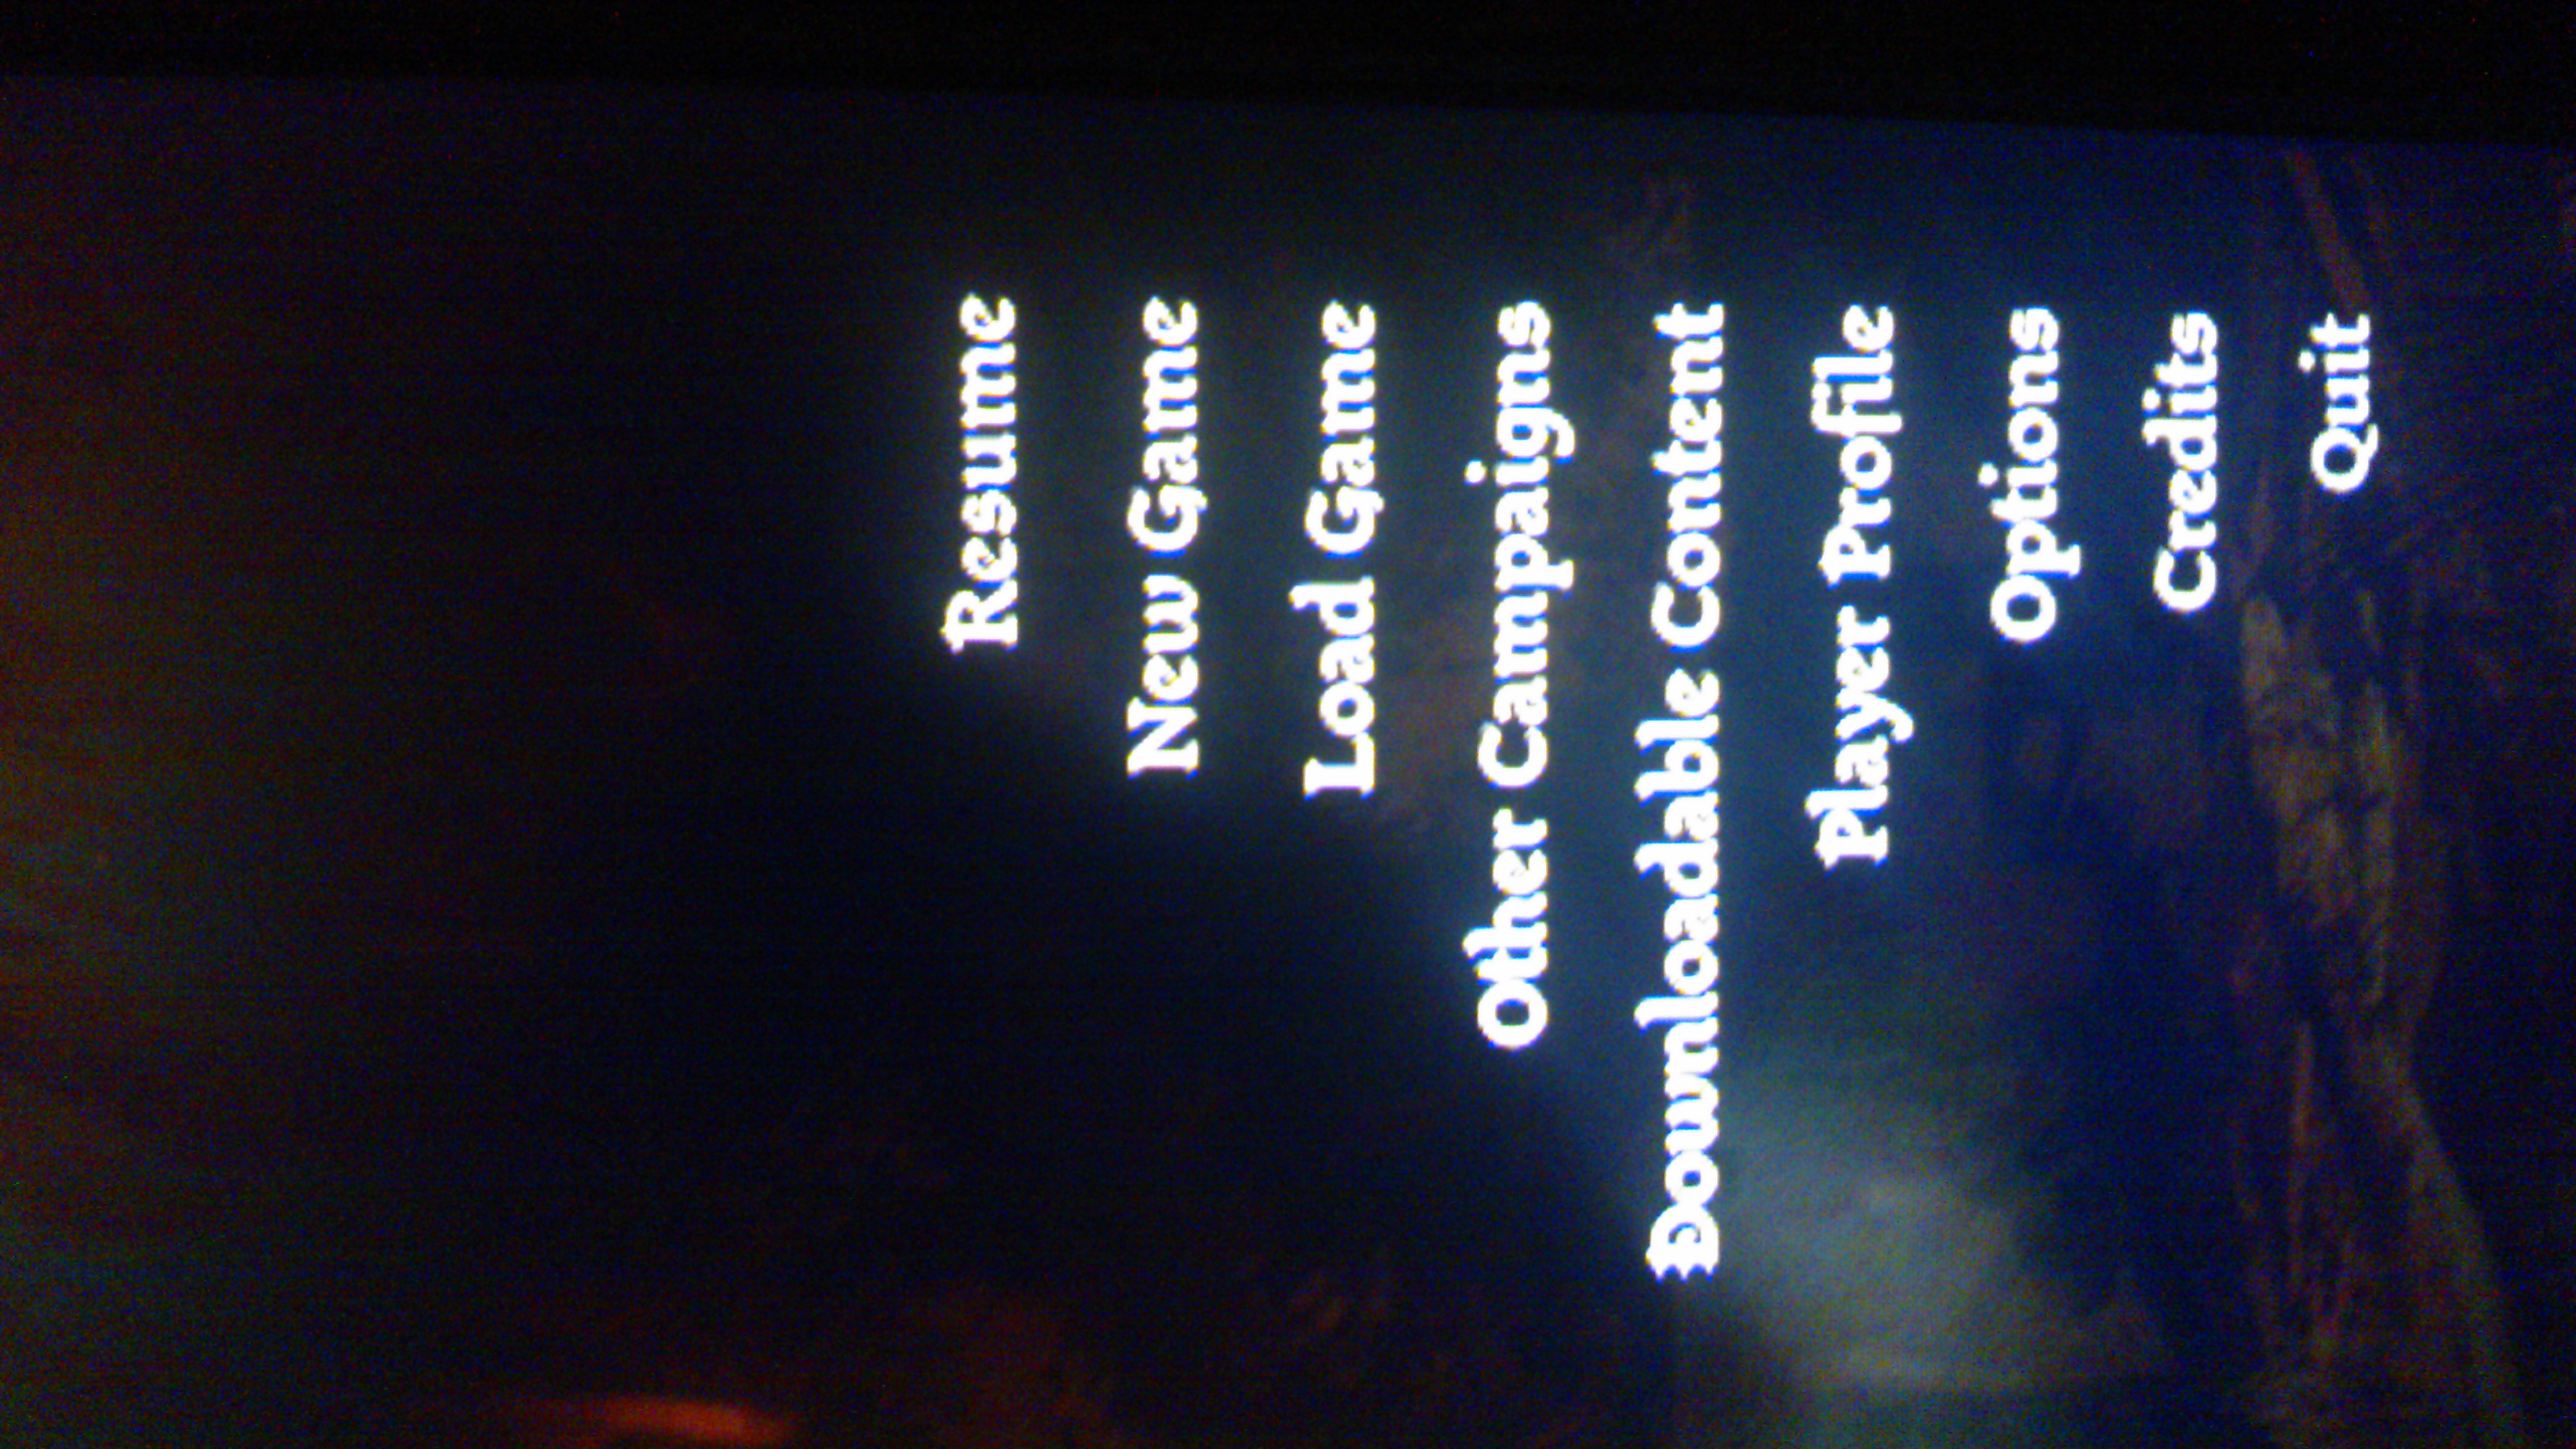 IF however, 3D Mode kicks IN but your image is corrupted LIKE in the picture bellow (Missing Pixels around text, weird colors, blurry image, etc - Hard to capture with a 60fps camera -_-)
 the solution is simple: YOU NEED AN EXTERNAL ACTIVE USB HUB in which to connect the converter
2. I haven't tested IT since I can't, but based on the research I did, it appears that Monitors that HAVE a BUILT-IN 3D EMITTER will render the emitter worthless if such an adapter is used. However, if an external 3D Emitter is used (besides the non-functional built-in one) the monitor will work in 3D Mode.
the solution is simple: YOU NEED AN EXTERNAL ACTIVE USB HUB in which to connect the converter
2. I haven't tested IT since I can't, but based on the research I did, it appears that Monitors that HAVE a BUILT-IN 3D EMITTER will render the emitter worthless if such an adapter is used. However, if an external 3D Emitter is used (besides the non-functional built-in one) the monitor will work in 3D Mode.
VI. [Tutorial] - How to fix video playback stuttering on Firefox
On some machines (and laptops) it appears that Firefox is unable to play a video without stuttering.
This problem is NOT particular to the videos of this website. In fact alot of users report having problem with Firefox and Youtube or any other site while trying to stream videos.
On my laptop, I had the same problem (while on my desktop it runs flawless). Initially I believed my laptop couldn't handle the file. Trying to play the file locally on Firefox, however revelead
the fact that is indeed Firefox who is unable to render it properly. ( The same file plays flawless in VLC player).
Upon many hours of investigation I found a remedy to this problem !
This will not COMPLETLY elimitate the stuttering (occasionally) it will still appear, however it will GREATLY improve the playback quality while streaming the videos from this website !
1. Open Firefox. In the address bar type about:config
2. In the "Search" box type video
3. Modiy the following values:
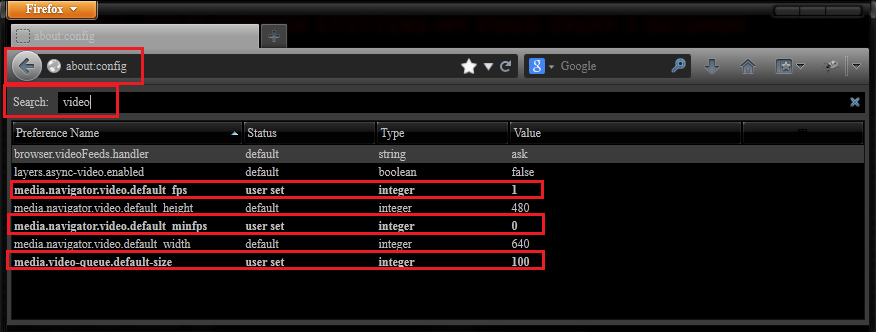
| media.navigator.video.default_fps |
Value = 1 |
| media.navigator.video.default_minfps |
Value = 0 |
| media.video-queue.default-size |
Value = 100 |
4. Restart Firefox
Now all the videos should play with minimum stuttering.
VII. [Tutorial] - How to save a video on your computer to watch later
All the video can be saved to you PC and later viewed. This method can also be used to watch the video using other hardware like AMD HD3D.
The HTML5 standard requires "WEBM" files. These files are actually a subset of Matroska toolset.
1. Download and Install MKVToolnix (the Matroska toolset).
2. Start streaming any video.
3. Once the video starts to play, pause it and press the "right-click" mouse button. Select "Save Video As..." option.
4. Save the file anywhere on your PC. It will be saved in as a "WEBM" file.
5. After it finished downloading open MKVToolnix GUI.
6. In the "Source Files:" section R-Click and select "Add Files" and open the downloaded WEBM file.
7. In the "Track, chapters, etc" section select the VIDEO track.
8. On the right pane scroll down until you find the "Stereoscopy" section and set "mono".
9. Make sure the the "Output file" has an ".mkv" extension.
10. Press the "Start muxing" button.
9. Around 3-5 seconds later, you will have a fully working mkv file that can be played with any other software like NVIDIA 3D Vision Video Player.
Important !
If after all this the video still doesn't play, make sure you have all the correct decoders installed.
Recommended and tested codec packs: K-Lite Codec Pack (Mega Version).
Important !
For practicality reasons each movie is split into multiple parts. On any webpage you can see the currently playing video from the playlist.
The above steps must be repeated for each video from the playlist in order to download the full video version.